 Blogging has sorta been pushed to the back burner a little while while I've been going through my massive crafting nesting phase! I need to come up with a system where I have time for both. I think I'm going to need to save crafting for my days off because it can take up so much time in the evenings when I get home from work. I think as time goes on and I get more experience (I'm NOT a crafty person) I'll get faster but for now I'll enjoy being a slow poke and seeing my finished product weeks later!
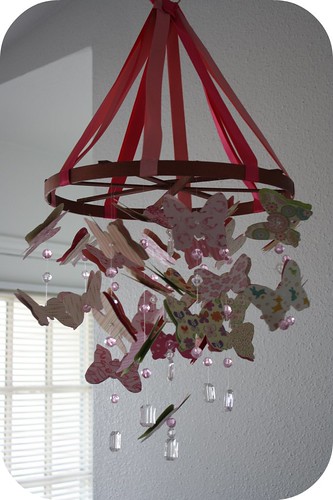 The first project I've been working on is a butterfly mobile for the nursery. I didn't like any of the regular store-bought kind, they just were to kiddish for me, so I looked up butterfly mobiles and decided to attempt to make my own! Now I'm going to try something else... I'm attempting to write my FIRST Do it Yourself post and share what I learned with you in case you want to try!
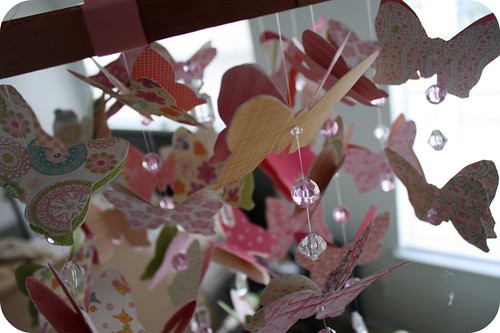
Beware for a lot of photos coming! I'll do my best to describe how I made it!
First, here's what you'll need:
-Scrapbook paper and cardstock paper in your desired colors
-A butterfly cutout about 3" by 3" in heavy paper or cardstock
-A 14", 16", or 18" wooden embroidery hoop (depending how large you want your mobile to be)
-(3) strips of 1/2" balsa wood
-Acrylic paint (the color you want the base of your mobile to be)
-Nylon thread (or something like beading thread or fishing wire)
-A needle
-32 small crystal beads
-About 32 other crystal beads in the color you like to make your mobile shine!
-(1) metal or plastic ring
-Scissors, glue, pencil
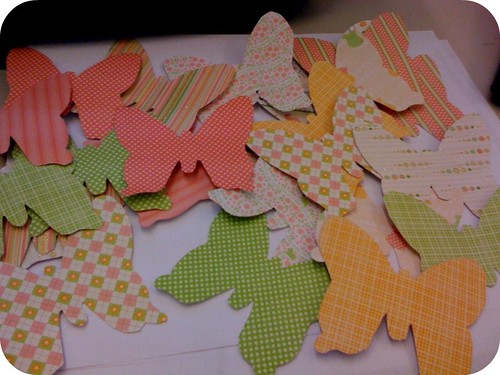
1. Take a traceable picture of a butterfly you like the shape of and use that as your template. I used a butterfly that was about 3" by 3". Trace the butterflies on cardstock and/ or scrapbook paper.
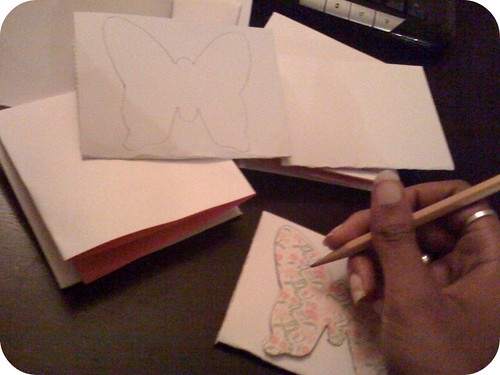 I used both because I liked some of the scrapbook paper I found, but it wasn't strong enough for it to stay bent the way I wanted.
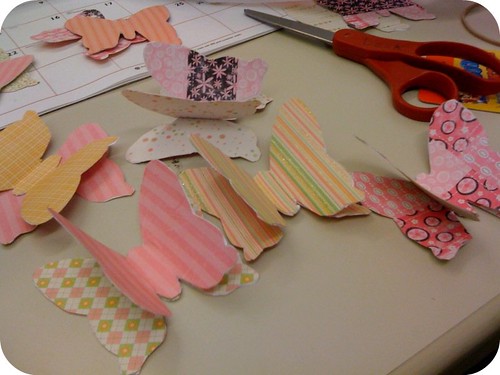
2. Cut out all of the butterflies you've traced. I cut out about 200 butterflies total (though I didn't use them all) and matched the scrapbook paper butterflies with color-coordinating cardstock. I folded the paper and cardstock to make the cutting quicker. I matched a pair of cardstock buterflies with a pair of scrapbook butterflies so four total.
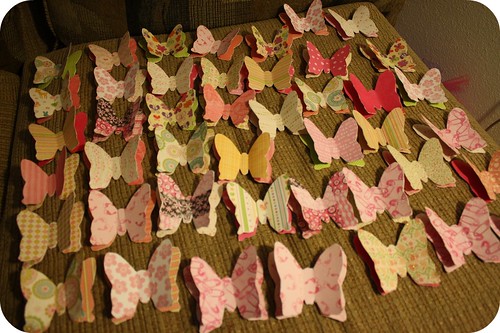
I ended up using 128 cut out butterflies total. 64 of them cardstock butterflies and 64 scrapbook paper butterflies.
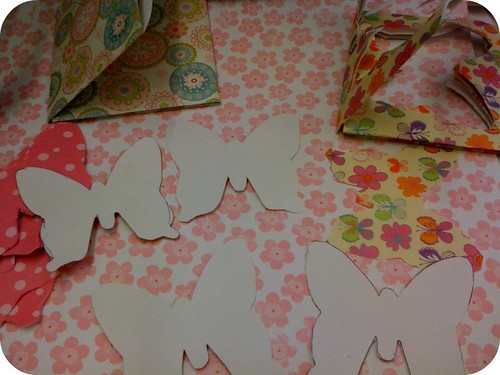
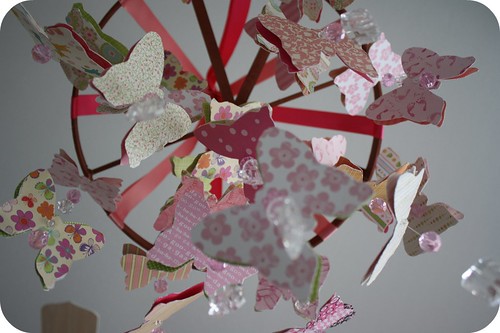
3. Glue the cardstock butterflies and coordinating scrapbook paper butterflies together and trim around the edges to they match up. You've now glued two seperate butterflies together so there's cardstock on one side and scrapbook paper on the other. They look identical though. Then take the one of the butterflies and bend up the wings slightly.
 Put a little glue down the center of the bent butterfly (on the under side), then stick it to the butterfly that's not bent. You can match the colors in the center or have them both facing the same way, I alternated the direction I glued mine.
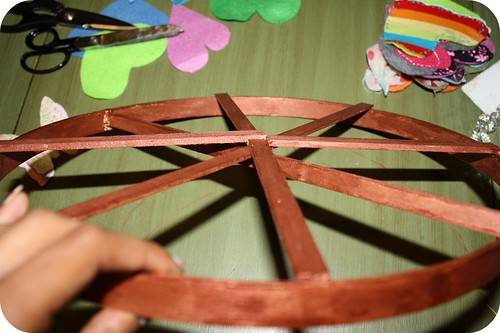
4. Make the base of the mobile by taking the center of the wooden embroidery hoop and evenly crossing strips of balsa wood to make 8 spokes.
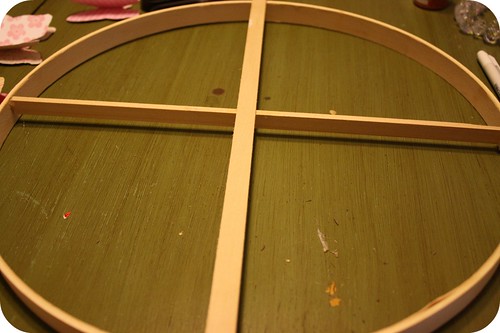
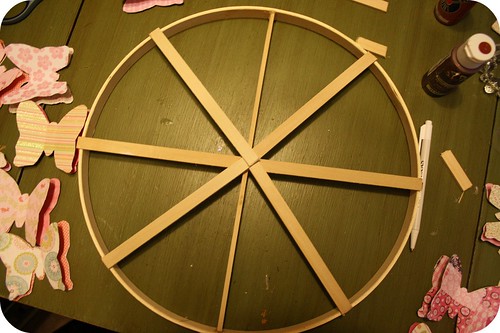
5. Paint the wood in the color you desire, I painted mine using a metallic bronze.
6. Attach 8 equally-sized strands of ribbon, or the beading wire to the mobile base and then attach them all to a metal or plastic ring. This is what's used to hang the mobile from the ceiling. (Don't make my mistake and do this last... It's much easier to attach the ribbon or string before you have tons of butterflies dangling off of it.)
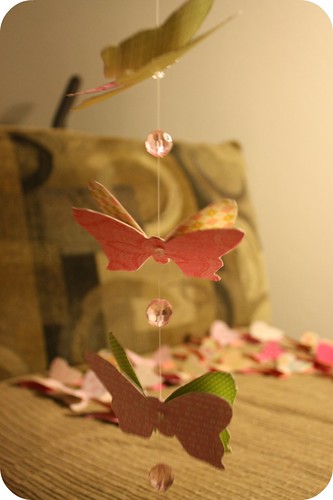
7. Take your beading wire and needle and thread the wire through the butterflies and beads you desire.
 Then tie them to the spokes around the base of the mobile.
 Here's how I spread mine out:
On the outer 8 spokes I had 2 butterflies dangling from each string.
In the middle I had 3 butterflies from a string on every-other spoke.
In the center there was the longest string with 4 butteflies dangling.
I added beads between the butterflies and at the very bottom of the string to weigh each strand down.
 Initially I had 3 butterflies hanging in the middle of all 8 spokes but I decided it was too much and went back and cut off every-other.
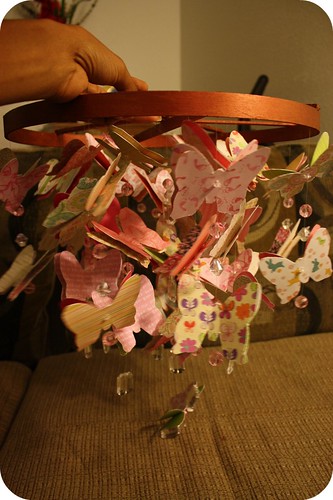

8. Find a pretty spot to hang it and show it off to the world!
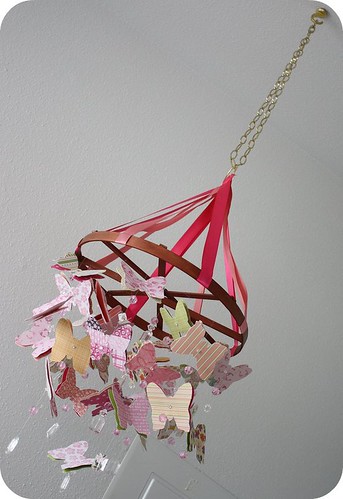
 This is what Spawnie will be staring up at after she's born!
 So what do you think? You going to try it?
Beautiful! You make it look pretty painless, I might have to consider trying my hand at a craft! :-)
ReplyDeleteAWes this is adorable!!!! I am making Kendall one too! I saw them on Etsy and refuse to pay $50, seems simple enough
ReplyDeleteWOW! It's gorgeous! It looks like something you would find in an upscale, expensive boutique. Great job!!
ReplyDeleteI loveeee it!!!
ReplyDeleteYa that is pretty darn cute and I do need a mobile but unfortunately I dont have the time. My boys would be all over those butterflies! hehe!
ReplyDeletethat is the coolest mobile EVER! Great job on it! I LOVE it!
ReplyDeleteAdorable! You crafty little nester:) Hope you are doing well!
ReplyDeleteThat is the cutest thing! You should Etsy some of those! If I knew someone that was having a girl I might attempt that.
ReplyDeleteIt's beautiful! Thanks so much for all of the lovely pictures of the progress. I just love tutorials. Your sweet baby girl is going to love it!
ReplyDeleteThat is so adorable! I would totally pay money for that in a store!
ReplyDeleteLove Love Love the butterfly creation!! :) You must be getting so excited to meet your baby! :) Best wishes to you.
ReplyDeleteI came across your blog through "Friday Follow". I am really enjoying meeting so many wonderful people though this feature. I am now one of your followers through Google Friend Connect.
Have an excellent weekend!! <3
Great JOb "Martha"... tee hee. some day if I have another girl I will have to make this. :)
ReplyDeleteThey are so beautiful! Wow, you are good. I will definitely learn to do it once I am preggo.
ReplyDeleteWould have loved to have something like this above the changing table when my daughter was an infant. Now that she's older, she's more interested in combing her hair or playing with Butt Paste.
ReplyDeletethat's amazing!
ReplyDeleteOhhh, soooo beautiful! Makes me wish I had more baby girls (due any day with baby #6 now, and out of all 6 only one is a girl!) Great job mama!
ReplyDeleteStopping by from FF....a new follower and loving your blog! Would be great to have a visit from you!
mommysblessings.blogspot.com
I love it! I can't find any that I like, either...maybe I should give crafting my own a try!
ReplyDeleteI am your newest follower through Friday follow! Except that it's now SATURDAY! Do I still count? ;)
ReplyDeleteI hope you will come check my blog out as too!
PS. Cant wait to come back for more of your AWESOME craftiness!
Shannon
http://milkandcuddles.com/
Wow, very cute.
ReplyDeleteWow! Very beautiful
ReplyDeleteComing over from FF. We are now following you.
Visiting from "All About Toys" http://bluepixo.blogspot.com
Beautiful! I'm sure Spawnie is going to LOVE it.
ReplyDeleteHere is a similar mobile and tutorial and other cool ideas: http://projectnursery.com/2010/01/butterfly-mobile/
ReplyDeleteWow it looks amazing! Now I need ideas for a boy one! :)
ReplyDeleteThat is so pretty and my girls would LOVE it, unfortunately they are 3 and 4 and would probably just tear it up LOL
ReplyDeleteWow that is just beautiful. I'm all about butterflies so this definitely caught my eye. I'm set to have an artsy crafty day at a family arts fest with my little ones so this is great inspiration. I love your blog! Do visit mine sometime at http://babesabouttown.com
ReplyDeletethis is really beautiful! well done, and who says you're not crafty?!
ReplyDeletebirds or rocketships could be cool for a boy one.
the colour combination is lovely - will the nursery follow that scheme?
What a cute project - love the papers you chose for it! It's very eye catching :) stopping by from SITS
ReplyDeleteI love this...I'm a preschool teacher and I think we'll make your cute butterflies for a project.
ReplyDeleteCome see me at www.zen-mama.com
That is lovely - and a nice well-illustrated tutorial too.
ReplyDelete@Zen mama - great idea, I teach kindergarten EFL, have been doing a unit themed round 'The Very Hungry Caterpillar' this term, and this would be a great craft project to round it off.
http://abigailscraftshowto.com
Loved the mobile its gorgeous thanks for the how to.
ReplyDeleteStopping by from SITS!
Mayya @ Sew Chic and Unique
http://www.sewchicandunique.com
Dropping in from SITS. LOVE the mobile. I think I'll be back :) I just wrote my birth story over at my blog. If you love gory birth details, take a peek :)
ReplyDeleteThis is adorable! I'm thinking I might make the colors to match my dining room and hang it as a chandelier since I have a boy. I think it's pretty enough yet casual enough for our dining room.
ReplyDeleteStopping by from SITS!
NOT CRAFTY! Who you kidding!!? You did a brillant job! I love it a lot. I might steal your idea and make some decorations for baby divas room, that mobile is amazing. And your DIY instructions were perfect. I am excited to see what you cook up next!
ReplyDeleteGorgeous! You could sell those!!! =) And congrats on your baby girl! You're getting closer!
ReplyDeleteWhat could be better then to have beautiful butterflies flutter over her head.
ReplyDeleteThis is very pretty! Wish I had a girl to make it for.
ReplyDeleteOmg, this is the cutest mobile in the world - I love it!!! You are so darn creative!!! :-)
ReplyDelete~Yakini
This idea was SUPER cute!!! So awesome and creative!
ReplyDeleteStopping by from SITS!
I LOVE IT!
ReplyDeleteThanks for posting your tutorial :-)
I love it! Stopping by from SITS!
ReplyDeleteWow, that is so cute!! Amazing! And here I am being all proud of myself because I started a scrapbook.
ReplyDeletethis is amazing! I'll definitly be tucking this idea away ... I just need a baby first! :)
ReplyDeleteSo so cute!! Great job
ReplyDeleteWOW! Bravo!
ReplyDeleteYou are crafty. I love it, the jewels will look beautiful at night. What a great idea! She is going to love it!
ReplyDeleteGood job!! I made a mobile once when I was little ... I think it was at church, but it wasn't like this! I love it!
ReplyDeleteThis is beautiful and very creative (and this is coming from someone who dislikes butterflies very, very much). Your daughter's room is going to be so sweet.
ReplyDeleteLOVE this project. Just ran out and got the stuff to make one. Hopefully it will turn out as good as yours!! Thank you so much for blogging about this.
ReplyDeleteGood job!! I made a mobile once when I was little ... I think it was at church, but it wasn't like this! I love it!
ReplyDelete